Monday, 28 May 2012

Baking - Wholewheat Bread Buns

It is Sunday morning and the breadmaker is busy kneading the dough again. Today I decided to make wholewheat bread buns. Again, more work is required baking those, as the breadmaker does only part of the work and I have to knead and shape the dough myself in the final stage.

I was not sure of the result as this was the first time I tried this recipe. Nevertheless, the bread buns turned out very tasty.


Did I tempt you to make them as well?

 Here is the recipe from my breadmaker's booklet:

  • 1 1/4 cups water
  • 2 tbsp skimmed milk powder
  • 2 tbsp melted butter
  • 2 tbsp honey
  • 1 tbsp brown sugar
  • 1 1/2 tsp salt
  • 3 1/4 cups strong wholewheat bread flour
  • 1 1/2 tsp fast action yeast

 Use setting for dough.


 After the dough program is finished, take the dough out of the bread maker and knead it well until the dough isn't sticking to the surface. You can sprinkle a bit of flour on the surface and on the dough throughout the kneading as this will make it easier. Then shape the dough into 6 - 8 rolls. Place on a greased baking tray and brush lightly with melted butter. Cover for 20 - 25 minutes. Allow to rise until they are double in size and glaze. Bake in the oven for approx 15 - 20 minutes at 190 degrees C.

If you would like to add caraway seeds and salt flakes to the buns, use a mix of egg yolk and a little bit of water as a glaze, then sprinkle the buns with caraway seeds and salt before baking.


Sunday, 20 May 2012

Handmade Happy Anniversary card - Butterflies and a heart

 Here is another Happy Anniversary card. I have done similar design previously - using the red heart with a red card as a background. In this variation I used different butterfly stickers and two butterflies instead of only one.


 To make this card you will need:


 Take white card 15cm x 30cm and fold it in half. Take a red card paper (size 15cm x 15cm) and using double sided tape attach it to the white card. Attach yellow card paper (9cm x 9cm), again using double sided tape, to the brown card paper (10 x 10cm) and then attach the heart (using foam pads cut to size to fit the thickness of the heart) to the middle of the yellow card paper. Attach a large butterfly to the heart and a small one to the top left corner of the yellow card. Attach 3 3mm red gems onto the yellow card next to the heart. Attach the brown card paper to the red card using foam pads. Add “Happy Anniversary” or "With Love" sticker to the card. 


Saturday, 19 May 2012

Baking - White Bread Buns

Being in a baking mode of late, I have been taking my breadmaker machine off its shelf every Saturday morning to bake fresh bread. I could not take any pictures of the results in the last few weeks however as the sun has been hiding behind a heavy gray clouds the whole time. All just looked dark and gloomy. But at last, the sun is shining through today. I decided to bake white bread rolls. More work is required baking those, as the breadmaker does only part of the work and I have to knead and shape the bread myself in the final stage. However, it is well worth the effort.


   Here is the recipe from my breadmaker's booklet:

  • 1 1/4 cups water
  • 1 tbsp skimmed milk powder
  • 2 tbsp melted butter
  • 2 tbsp sugar
  • 1 1/2 tsp salt
  • 3 1/4 cups strong white bread flour
  • 1 1/2 tsp fast action yeast

 Use setting for dough.

After the dough program is finished, take the dough out of the bread maker and knead it well until the dough isn't sticking to the surface. You can sprinkle a bit of flour on the surface and on the dough throughout the kneading as this will make it easier. Then shape the dough into 6 - 8 rolls. Place on a greased baking tray and brush lightly with melted butter. Cover for 20 - 25 minutes. Allow to rise until they are double in size and glaze. Bake in the oven for approx 15 - 20 minutes at 190 degrees C.

If you would like to add poppy seeds to the buns, use a mix of egg yolk and a little bit of water as a glaze, then sprinkle the buns with poppy seeds before baking.


Monday, 14 May 2012

Handmade Happy Birthday Cards - Flowers and Butterflies Outline Stickers 4

This is the 4th handmade card I made using some spare outline stickers. This card design is quite different to the previous 4. It looks a bit more complicated but even this card is not difficult to make.


In this design I used Matchmakers Textured Cardstock with white core size 6” x 6”. If you would like to end up having the white edge when you tear off round the edge of the medium dark coffee cream card paper as I have in this design, use a card stock with white core.

For this design you will need:

  • Butterflies outline sticker in silver (see links  further bellow for suggested outline stickers) 
  • White card paper (15 x 30cm)
  • White card paper ( appx. 6 x 6 cm - large enough to fit the outline sticker on)
  • Medium dark coffee cream card paper with white core(appx. 9 x 9 cm - large enough to fit the white card paper with outline sticker on)
  •  Medium dark coffee cream card paper (7 x 15 cm)
  •  Dark lilac card paper (5 x 15 cm)
  • Light coffee cream card paper (15 x 15cm)
  • Craft foam pads (I used Stix 2mm thick)
  • gel pens (various colours)
  • adhesive ribbon (see link bellow)
  • Double sided tape 
  • "Happy Birthday" outline sticker


Adhesive ribbon used in this design:

http://direct.hobbycraft.co.uk/products-HobbyCraft-Flower-Adhesive-Ribbon_290334.htm

Take white card 15cm x 30cm and fold it in half. Take light coffee cream card paper (size 15 x 15cm) and using a double sided tape attach it to the front of the folded white card. Attach medium dark coffee cream paper (7 x 15 cm) to the left on the light coffee cream card and then attach the dark lilac card (5 x 15cm) to the left on the dark coffee cream paper (7 x 15cm) using double sided tape. Take medium dark coffee cream paper (9 x 9 cm) and tear off the edge to create a uneven round shape and attach this to the main card using foam pads. Then take a white card paper (apprx 6 x 6 cm) and attach a butterfly outline sticker to its centre. Colour in the butterfly sticker using gel pens. Tear off the edge of the white paper around the sticker to create an uneven edge. Using double sided tape, attach the white paper with the outline sticker to the centre of the medium dark coffee cream round shaped card.
Attach lilac flower ribbon to the right edge of the lilac card and add “Happy Birthday ” outline sticker.


Thursday, 10 May 2012

Handmade Happy Birthday Cards - Flowers and Butterflies Outline Stickers 3

This is another card of the 4 cards I made using some spare outline stickers. It can be done in under 10 minutes. There is really not much to it. This card is very easy and quick to make.


 In this design I used Matchmakers Textured Cardstock with white core size 6” x 6”. If you would like to end up having the white edge when you tear off the edge of the yellow card paper around the outline sticker as in this design, use a card paper with white core. 

For this design you will need:

  • Butterflies outline sticker in silver (see links further bellow for suggested outline stickers)
  • White card paper (15 x 30cm)
  • Saffron yellow card paper with white core ( appx. 8 x 8 cm - large enough to fit the outline sticker on)
  • Dark brown card paper (appx. 8 x 8 cm - large enough to fit the yellow card paper with outline sticker on)
  • Light coffee cream card paper (15 x 15cm)
  • Craft foam pads (I used Stix 2mm thick)
  • 4 purple gems (I used Hobbycraft gems- size 2mm)
  • Double sided tape 
  • "Happy Birthday" outline sticker
  • Craft corner punch (I have had mine for a very long time so you might not be able to purchase the same one, however I found couple of nice craft punches that would also work well with this design - see pictures bellow - link is added with the pictures)
Ahttp://direct.hobbycraft.co.uk/products-HobbyCraft-1%E2%80%9D-Daisy-Design-Craft-Corner-Punch_296849.htm

http://direct.hobbycraft.co.uk/products-HobbyCraft-1%E2%80%9D-Tulip-Design-Craft-Corner-Punch_296847.htm

Suggested butterfly outline stickers - see following links:
  • http://direct.hobbycraft.co.uk/products-Anitas-Outline-Stickers-Elegant-Butterflies-Silver_361943.htm
  • http://direct.hobbycraft.co.uk/products-Hobbycraft-Silver-Butterflies-Stickers_280616.htm
  • http://www.craftsuperstore.co.uk/Peel_Off_Sticker_-_Butterfly_Silver.html

Take white card 15cm x 30cm and fold it in half. Take light coffee cream card paper (size 15 x 15cm) and using a double sided tape attach it to the front of the folded white card. Take yellow card paper (apprx 8 x 8 cm) and attach a butterfly outline sticker to its centre. Tear off the edge of the yellow paper around the sticker to create an uneven edge. Using double sided tape, attach the yellow paper with the outline sticker to the centre of the dark brown card (appr. 8 x 8 cm). Cut corners of the dark brown card paper with the craft punch and attach the dark brown card to the light coffee cream card (15 x 15 cm) using foam pads. Attach 4 purple gems and a “Happy Birthday ” outline sticker to the card.

Done. 

Saturday, 5 May 2012

Handmade Happy Birthday Cards - Flowers and Butterflies Outline Stickers 2

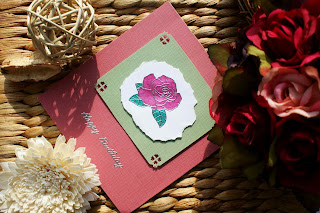
This is the 2nd card of the 4 cards I made using some old flowers and butterflies outline stickers I kept and recently found in my craft box. If you cannot find the same outline sticker, it doesn't matter. Any suitable flower decoration will do. Anyway, further below I have some links to some flower outline stickers if you don't have any.


In this design I used Matchmakers Textured Cardstock with white core size 6” x 6”.

For this design you will need:

  • Flowers outline sticker in silver (see links  further bellow for suggested outline stickers) 
  • White card paper (15 x 30cm)
  • White card paper ( appx. 10 x 10 cm - large enough to fit the outline sticker on)
  • Sage green card paper (appx. 10 x 7 cm - large enough to fit the white card paper with outline sticker on)
  • Dark pink card paper (15 x 15cm)
  • Craft foam pads (I used Stix 2mm thick)
  • gel pens - various colours 
  • Double sided tape 
  • "Happy Birthday" outline sticker
  • Craft corner punch (I have had mine for a very long time so you might not be able to purchase the same one, however I found couple of nice craft punches that would also work well with this design - see pictures below - link is added with the pictures)
http://direct.hobbycraft.co.uk/products-HobbyCraft-1%E2%80%9D-Daisy-Design-Craft-Corner-Punch_296849.htm

http://direct.hobbycraft.co.uk/products-HobbyCraft-1%E2%80%9D-Tulip-Design-Craft-Corner-Punch_296847.htm
Suggested flower outline stickers - see following links:
The outline flower stickers suggested above would work on the card, nonetheless, they are not similar to the one I used in this design. If you would like to make the card as similar to mine as possible and you do not have any outline stickers with roses, you can use a stamp instead. I found some nice ones on Hobbycraft online shop. See pics and links below.

http://direct.hobbycraft.co.uk/products-Personal-Impressions-Brush-Rose-Rubber-Stamp_234532.htm

http://direct.hobbycraft.co.uk/products-Personal-Impressions-Single-Rose-Rubber-Stamp_234498.htm

http://direct.hobbycraft.co.uk/products-Personal-Impressions-Stamp-Roses-In-The-Garden-Stamps_120880.htm


Instructions:

Take white card 15cm x 30cm and fold it in half. Take pink card paper (size 15 x 15cm) and using a double sided tape attach it to the front of the folded white card. Take white card paper (approx 10 x 10 cm) and attach a flower outline sticker to its centre. Tear off the edge of the white paper around the sticker to create an uneven edge (ensure that you tear off enough of the paper so that the resulting size of the white paper is smaller than that of the sage green card) . If you are using the stamp instead of the outline sticker, just stamp the image onto the white card using black ink. Colour in the flower using gel pens. Using double sided tape, attach the white paper with the outline sticker (or the stamped flower image) to the the green sage card (approx 10 x 7cm). Cut corners of the sage green card paper with the craft punch and attach the sage green card to the pink card (15 x 15 cm) using foam pads. Add “Happy Birthday ” outline sticker to the card.

Of course you can use other outline stickers, rather than "Happy Birthday", so "Happy Mothers Day", "Best Wishes", "Congratulations" are all equally suitable.

And here then is what the finished product looks like: