Showing posts with label cardmaking instructions. Show all posts

Thursday, 22 November 2012

Handmade Xmas Cards - Colour Variations on Xmas Stocking Design

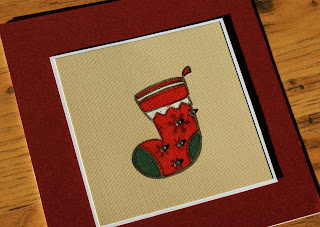
In my previous posting I showed you christmas card design - a Xmas stocking in a red frame. Here are pictures of various colours that also work with the design. Instructions on how to make it you will find in my previous post. All cards are very easy to make.


To colour the xmas stocking I used "Traditional Christmas" Letraset promarkers set. You can purchase it from my blog's online shop as well a xmas stocking stamp if you do not have one.


 1) 
  • Dark purple card (15 x 15 cm)
  • Dark Green card ( 10 x 10 cm)
  • White card (9 x 9 cm) 
  • 5 silver adhesive gems


2)
  • Dark red card (15 x 15 cm)
  • White card ( 10 x 10 cm)
  • Pale mocha-cream card (9 x 9 cm) 
  • 5 silver adhesive gems


3)
  • Medium purple card (15 x 15 cm)
  • White card ( 10 x 10 cm)
  • Pale bluish gray card (9 x 9 cm) 
  • 5 silver adhesive gems


4)
  • Purple card with pink shade (15 x 15 cm)
  • White card ( 10 x 10 cm)
  • Pale mocha-cream card (9 x 9 cm) 
  • 5 purple adhesive gems


5)
  • Strong green card (15 x 15 cm)
  • Brownish red card ( 10 x 10 cm)
  • White card (9 x 9 cm) 
  • 5 red adhesive gems


6)
  • Sage green card (15 x 15 cm)
  • Brownish red card ( 10 x 10 cm)
  • White card (9 x 9 cm) 
  • 5 red adhesive gems


7)
  • Bright green card (15 x 15 cm)
  • White card ( 10 x 10 cm)
  • Brown card (9 x 9 cm) 
  • 5 silver adhesive gems


Friday, 16 November 2012

Handmade Xmas Cards - Xmas Stocking

This is another of the quick and easy cards. You can make quite a few of them in one evening and have them ready to post to all of your relatives and friends, just in time for xmas.


To make this card you will need:

  • White card paper (15 x 30cm)
  • Dark red card paper (15 x 15cm)
  • White card paper (10 x 10cm)
  • Pale mocha-cream card paper (9 x 9cm)
  • Message outline sticker "Merry Christmas" (optional)
  • Double sided tape 
  • Letraset promarkers (making this card I used set of 6 - Letraset Metallic Traditional Christmas promarkers - which you can purchase from my blog's Craft Magic Online Shop)
  • Xmas Stocking craft stamp (you can purchase similar stamp from my blog's online shop)
  •  5 silver adhesive gems
  • Craft foam pads (I used Stix 2mm thick)

Letraset Promarker Sets and Xmas stocking stamps: (Click on pictures to see more detail)

Letraset Metallic Traditional Christmas ProMarker Set (Pack of 6)
  Letraset ProMarker Christmas Traditional and Contemporary Twin Pack (12 Pens Total) 


Mini Clear Stamp 3"X5"-StockingPergamano Clear Stamp Set - Santa & Presents #41917


2 inch christmas stocking Rubber StampHero Arts Clear Stamps Xmas Sprinkle Your Holiday


I have set up and online shop - CRAFT MAGIC ONLINE SHOP- on my blog (top right corner). You can now purchase many crafting supplies right here. The shop is powered by Amazon, so you would be making the purchase through Amazon. I have just selected (and sorted into various categories) crafting products that Amazon sells. My blog's shop is divided into 2 parts; one offers paper crafting and scrapbooking supplies and the other one is for crafty kids and offers variety of beautiful crafty kits and products designed for children. 


Instructions:

Take white card 15cm x 30cm and fold it in half. Take a dark red card paper (size 15cm x 15cm) and using double sided tape attach it to the white card. Stamp an image of a xmas stocking on the pale mocha-cream card (9 x 9cm) and colour it in using letraset promarkers. 
Take a pale mocha-cream card (9 x 9 cm) and attach it to the white card (10 x 10 cm) using double sided tape. Attach the white-mocha-cream card to the middle of the red card using foam pads.

Attach the adhesive gems to the stocking.

If you like, attach a "Merry Christmas" outline sticker to the card.


You can use different colour paper to stamp the xmas stoking on. Here are some examples:


Use sage green card paper instead of the mocha-cream paper


Or just stamp the xmas stocking onto a white card paper (size 9 x 9 cm) and attach it to a green card (10 x 10cm) instead.


Monday, 14 May 2012

Handmade Happy Birthday Cards - Flowers and Butterflies Outline Stickers 4

This is the 4th handmade card I made using some spare outline stickers. This card design is quite different to the previous 4. It looks a bit more complicated but even this card is not difficult to make.


In this design I used Matchmakers Textured Cardstock with white core size 6” x 6”. If you would like to end up having the white edge when you tear off round the edge of the medium dark coffee cream card paper as I have in this design, use a card stock with white core.

For this design you will need:

  • Butterflies outline sticker in silver (see links  further bellow for suggested outline stickers) 
  • White card paper (15 x 30cm)
  • White card paper ( appx. 6 x 6 cm - large enough to fit the outline sticker on)
  • Medium dark coffee cream card paper with white core(appx. 9 x 9 cm - large enough to fit the white card paper with outline sticker on)
  •  Medium dark coffee cream card paper (7 x 15 cm)
  •  Dark lilac card paper (5 x 15 cm)
  • Light coffee cream card paper (15 x 15cm)
  • Craft foam pads (I used Stix 2mm thick)
  • gel pens (various colours)
  • adhesive ribbon (see link bellow)
  • Double sided tape 
  • "Happy Birthday" outline sticker


Adhesive ribbon used in this design:

http://direct.hobbycraft.co.uk/products-HobbyCraft-Flower-Adhesive-Ribbon_290334.htm

Take white card 15cm x 30cm and fold it in half. Take light coffee cream card paper (size 15 x 15cm) and using a double sided tape attach it to the front of the folded white card. Attach medium dark coffee cream paper (7 x 15 cm) to the left on the light coffee cream card and then attach the dark lilac card (5 x 15cm) to the left on the dark coffee cream paper (7 x 15cm) using double sided tape. Take medium dark coffee cream paper (9 x 9 cm) and tear off the edge to create a uneven round shape and attach this to the main card using foam pads. Then take a white card paper (apprx 6 x 6 cm) and attach a butterfly outline sticker to its centre. Colour in the butterfly sticker using gel pens. Tear off the edge of the white paper around the sticker to create an uneven edge. Using double sided tape, attach the white paper with the outline sticker to the centre of the medium dark coffee cream round shaped card.
Attach lilac flower ribbon to the right edge of the lilac card and add “Happy Birthday ” outline sticker.


Thursday, 10 May 2012

Handmade Happy Birthday Cards - Flowers and Butterflies Outline Stickers 3

This is another card of the 4 cards I made using some spare outline stickers. It can be done in under 10 minutes. There is really not much to it. This card is very easy and quick to make.


 In this design I used Matchmakers Textured Cardstock with white core size 6” x 6”. If you would like to end up having the white edge when you tear off the edge of the yellow card paper around the outline sticker as in this design, use a card paper with white core. 

For this design you will need:

  • Butterflies outline sticker in silver (see links further bellow for suggested outline stickers)
  • White card paper (15 x 30cm)
  • Saffron yellow card paper with white core ( appx. 8 x 8 cm - large enough to fit the outline sticker on)
  • Dark brown card paper (appx. 8 x 8 cm - large enough to fit the yellow card paper with outline sticker on)
  • Light coffee cream card paper (15 x 15cm)
  • Craft foam pads (I used Stix 2mm thick)
  • 4 purple gems (I used Hobbycraft gems- size 2mm)
  • Double sided tape 
  • "Happy Birthday" outline sticker
  • Craft corner punch (I have had mine for a very long time so you might not be able to purchase the same one, however I found couple of nice craft punches that would also work well with this design - see pictures bellow - link is added with the pictures)
Ahttp://direct.hobbycraft.co.uk/products-HobbyCraft-1%E2%80%9D-Daisy-Design-Craft-Corner-Punch_296849.htm

http://direct.hobbycraft.co.uk/products-HobbyCraft-1%E2%80%9D-Tulip-Design-Craft-Corner-Punch_296847.htm

Suggested butterfly outline stickers - see following links:
  • http://direct.hobbycraft.co.uk/products-Anitas-Outline-Stickers-Elegant-Butterflies-Silver_361943.htm
  • http://direct.hobbycraft.co.uk/products-Hobbycraft-Silver-Butterflies-Stickers_280616.htm
  • http://www.craftsuperstore.co.uk/Peel_Off_Sticker_-_Butterfly_Silver.html

Take white card 15cm x 30cm and fold it in half. Take light coffee cream card paper (size 15 x 15cm) and using a double sided tape attach it to the front of the folded white card. Take yellow card paper (apprx 8 x 8 cm) and attach a butterfly outline sticker to its centre. Tear off the edge of the yellow paper around the sticker to create an uneven edge. Using double sided tape, attach the yellow paper with the outline sticker to the centre of the dark brown card (appr. 8 x 8 cm). Cut corners of the dark brown card paper with the craft punch and attach the dark brown card to the light coffee cream card (15 x 15 cm) using foam pads. Attach 4 purple gems and a “Happy Birthday ” outline sticker to the card.

Done. 

Friday, 27 April 2012

Handmade Happy Birthday Cards - Flowers and Butterflies outline stickers variations


Last week I found a couple of outline sticker sheets that I have had in my craft box for quite some time. Whenever I make my visit to the Hobbycraft store, I inevitably end up buying some new outline stickers. They are not expensive yet very handy to have for those days when you don't have much spare time but would still like to surprise somebody with a handmade card. I have done 4 cards recently using flowers and butterflies silver outline stickers. This is the 1st card of the lot.


 I like to mix and match various colours of textured card paper. In this design I used Matchmakers Textured Cardstock with white core size 6” x 6”.

For this design you will need:

  • Flowers outline sticker in silver (see links  further bellow for suggested outline stickers) 
  • Butterflies outline sticker in silver (see links further bellow for suggested outline stickers)
  • White card paper (15 x 30cm)
  • White card paper ( appx. 10 x 10 cm - large enough to fit the outline stickers on)
  • Lilac card paper (appx. 10 x 10 cm - large enough to fit the white card paper with outline stickers on)
  • Pastel Yellow card paper (15 x 15cm)
  • Craft foam pads (I used Stix 2mm thick)
  • gel pens - various colours 
  • Double sided tape 
  • "Happy Birthday" outline sticker
  • Craft corner punch (I have had mine for a very long time so you might not be able to purchase the same one, however I found couple of nice craft punches that would also work well with this design - see pictures bellow - link is added with the pictures)
Ahttp://direct.hobbycraft.co.uk/products-HobbyCraft-1%E2%80%9D-Daisy-Design-Craft-Corner-Punch_296849.htm

http://direct.hobbycraft.co.uk/products-HobbyCraft-1%E2%80%9D-Tulip-Design-Craft-Corner-Punch_296847.htm
Suggested flower outline stickers - see following links:
  • http://direct.hobbycraft.co.uk/products-HobbyCraft-Happy-Mothers-Day-Silver-Stickers_280509.htm 
  • http://www.amazon.co.uk/Silver-Outline-Stickers-Peel-Flowers/dp/B005767938/ref=sr_1_16?ie=UTF8&qid=1335484223&sr=8-16
  • http://www.amazon.co.uk/Anitas-Outline-Stickers-Silver-Bouquet/dp/B0068JQ2U4/ref=sr_1_1?ie=UTF8&qid=1335484777&sr=8-1
Suggested butterfly outline stickers - see following links:
  • http://direct.hobbycraft.co.uk/products-Anitas-Outline-Stickers-Elegant-Butterflies-Silver_361943.htm
  • http://direct.hobbycraft.co.uk/products-Hobbycraft-Silver-Butterflies-Stickers_280616.htm
  • http://www.craftsuperstore.co.uk/Peel_Off_Sticker_-_Butterfly_Silver.html

Take white card 15cm x 30cm and fold it in half. Take yellow card paper (size 15 x 15cm) and using a double sided tape attach it to the front of the folded white card. Take white card paper (apprx 10 x 10 cm) and attach a flower and a butterfly outline stickers to its centre. Tear off the edge of the white paper around the stickers to create an uneven edge. Colour in the flower and the butterfly using gel pens. Using double sided tape, attach the white paper with the outline stickers to the centre of the lilac card (appr. 10 x 10cm). Cut corners of the lilac card paper with the craft punch and attach the lilac card to the yellow card (15 x 15 cm) using foam pads. Add “Happy Birthday ” outline sticker to the card.


Done.


This is a design variation using different flower and butterfly sticker and different shades of the card paper.


Tuesday, 17 April 2012

Quick and Easy Handmade Birthday Card for Men and Boys - Nautical Theme

I would like to show you another quick and easy design for a handmade birthday card.


 To make this card I used Matchmakers Textured Cardstock with white core sizes 6” x 6” in Neutrals, even though any other types would go just well too.


For this design you will need:

  • Ship / Boat outline sticker (You can use following link to order outline sticker similar to the one I used - http://www.papercraftsformen.co.uk/moredetails.asp?itemid=5685&group2id=1440&subxgroupid=1440&xgroupid=44&id=1440 or http://www.papercraftsformen.co.uk/moredetails.asp?itemid=5486&group2id=1440&subxgroupid=1440&xgroupid=44&id=1440)
  • White card paper (15 x 30cm)
  • Blue card paper (15 x 15cm)
  • White card paper (large enough to fit the ship / boat outline sticker on)
  • Light gray card paper (15 x 15cm)
  • Double sided tape
  • "Happy Birthday" outline sticker 
  • red and blue gel pens 

Take white card 15cm x 30cm and fold it in half. Take a light gray card paper (size 15 x 15cm) and using a double sided tape attach it to the front of the folded white card. Take a blue card and position it onto the gray card turning it 45 degrees so that the corners of the blue card stick out over the sides of the gray card. Attach the blue card to the gray card using a double sided tape, then cut off the parts of the blue paper that are sticking out over the sides of the gray paper.
Take a white card paper and attach a ship or a boat outline sticker to its centre, then tear off the edge of the white paper around the outline sticker to create an uneven edge. Colour in the outline sticker using the gel pens. Using double sided tape, attach the white paper with the outline sticker to the blue card.
Add "Happy Birthday" outline sticker to the card.

And it's done.


If you would like to take it a step further and make it even more special, make your own envelope. You can find the instructions in "Handmade Envelope" post in my blog's archive under March 2011.