Tuesday, 12 June 2012

Handmade "Happy Father's Day" Card - Motorbike

There is still enough time to make a "Happy Father's Day" card. Here is another quick and easy handmade card and instructions on how to make it. This design could be also used to make a "Happy Birthday" card.


In this design I used Papermania Solid Cardstock Assorted Colours (6” x 6”) card papers and Matchmakers Textured Cardstock with white core (3.875” x 3.875”) in Neutrals and Brights.


For this design you will need:

  • Motorbike outline sticker from Anita’s Silver Car Collection (You can use following link http://direct.hobbycraft.co.uk/products-Anitas-Outline-Sticker-Silver-Car-Collection_316208.htm)
  • 5 Red adhesive gems (I used Hobbycraft gems size 2mm)
  • White card paper (15 x 30cm)
  • Pastel blue card paper (9 x 9cm)
  • Red card paper (10 x 10 cm)
  • Small piece of red card paper to fit the motorbike outline sticker on
  • Pale blue card paper (15 x 15cm)
  • Blue gel pen or "Happy Father's Day" outline sticker in silver
  • Double sided tape
  • Craft foam pads (I used Stix 2mm thick)

Take white card 15cm x 30cm and fold it in half. Take pale blue card paper (size 15 x 15cm) and using a double sided tape attach it to the front of the folded white card. Take pastel blue card paper (9 x 9cm) and attach it to the red card paper (10 x 10cm) using a double sided tape. Attach the pastel blue card paper with the red card paper to the middle of the pale blue card using foam pads.

Take the motorbike outline sticker and attach it to a piece of a red card. Cut alongside of the outline of the motorbike outline sticker, cutting the motorbike out. Attach the motorbike to the middle of the pastel blue card using foam pads.

Attach 5 red gems to the pastel blue card and write "Happy Father's Day" onto a card. Alternatively use a "Happy Father's Day" outline sticker instead.


Handmade "Happy Father's Day" Card - Classic Cars

There is still enough time to make a "Happy Father's Day" card. Here is another quick and easy handmade card and instructions on how to make it. If you have already made one, you can use this design to make a "Happy Birthday" card.


In this design I used Papermania Solid Cardstock Assorted Colours (6” x 6”) card papers and Matchmakers Textured Cardstock with white core (3.875” x 3.875”) in Neutrals and Brights.


For this design you will need:

  • Anita’s Silver Car outline sticker (You can use following link http://direct.hobbycraft.co.uk/products-Anitas-Outline-Sticker-Silver-Car-Collection_316208.htm)
  • 5 Red adhesive gems (I used Hobbycraft gems size 2mm)
  • White card paper (15 x 30cm)
  • Pale blue-gray card paper (9 x 9cm)
  • Red card paper (10 x 10 cm)
  • Small piece of red card paper to fit the car outline sticker on
  • Strong bright blue card paper (15 x 15cm)
  • White gel pen or "Happy Father's Day" outline sticker in silver
  • Double sided tape
  • Craft foam pads (I used Stix 2mm thick)

Take white card 15cm x 30cm and fold it in half. Take bright blue card paper (size 15 x 15cm) and using a double sided tape attach it to the front of the folded white card. Take pale blue-gray card paper (9 x 9cm) and attach it to the red card paper (10 x 10cm) using a double sided tape. Attach the blue-gray card paper with the red card paper to the middle of the bright blue card using foam pads.

Take the car outline sticker and attach it to a piece of a red card. Cut alongside of the outline of the car outline sticker, cutting the car out. Attach the car to the middle of the blue-gray card using foam pads.

Attach 5 red gems to the blue-gray card and write "Happy Father's Day" onto a card. Alternatively use a "Happy Father's Day" outline sticker instead.


Design variations:


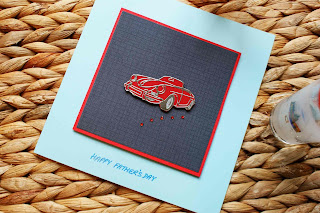
Handmade Happy Father's Day Card - Fast Cars

There is still enough time to make a "Happy Father's Day" card. Here is another quick and easy handmade card and instructions on how to make it. This design could be also used to make a "Happy Birthday" card for men.


In this design I used Papermania Solid Cardstock Assorted Colours (6” x 6”) card papers and Matchmakers Textured Cardstock with white core (3.875” x 3.875”) in Neutrals and Brights.


For this design you will need:

  • Anita’s Silver Car outline sticker (You can use following link http://direct.hobbycraft.co.uk/products-Anitas-Outline-Sticker-Silver-Car-Collection_316208.htm)
  • 5 Red adhesive gems (I used Hobbycraft gems size 2mm)
  • White card paper (15 x 30cm)
  • Dark navy blue card paper (9 x 9cm)
  • Red card paper (10 x 10 cm)
  • Small piece of red card paper to fit the car outline sticker on
  • Pale blue card paper (15 x 15cm)
  • Blue gel pen or "Happy Father's Day" outline sticker in silver
  • Double sided tape
  • Craft foam pads (I used Stix 2mm thick)

Take white card 15cm x 30cm and fold it in half. Take pale blue card paper (size 15 x 15cm) and using a double sided tape attach it to the front of the folded white card. Take dark navy blue card paper (9 x 9cm) and attach it to the red card paper (10 x 10cm) using a double sided tape. Attach the navy blue card paper with the red card paper to the middle of the pale blue card using foam pads.

Take the car outline sticker and attach it to a piece of a red card. Cut alongside of the outline of the car outline sticker, cutting the car out. Attach the car to the middle of the dark navy blue card using foam pads.

Attach 5 red gems to the dark navy blue card and write "Happy Father's Day" onto a card. Alternatively use a "Happy Father's Day" outline sticker instead.


And here are some variations:


Monday, 4 June 2012

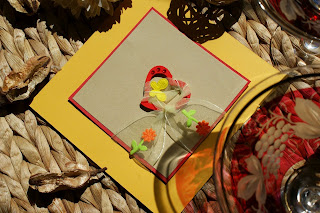
Handmade Greeting Card - Colour Variation 2 - Red Heart and a Ribbon

This is the 2nd colour variation on handmade greeting card with the red heart and the ribbon.


  To make this card you will need:

  • Large red heart (I used one from a packet of 20 hearts by Craft For Occasions - purchased from Hobbycraft) http://direct.hobbycraft.co.uk/products-Craft-For-Occasions-Red-Outline-Heart-Shapes_246011.htm
  • 4 Adhesive gems in red (I used Hobbycraft gems sizes 3 mm)
  • Pale sage green card paper (9 x 9 cm)
  • Red card paper (10 x 10cm)
  • White card paper (15 x 30cm)
  • Bright yellow card paper (15 x 15cm)
  • Yellow organza ribbon
  • Message outline sticker of your choice
  • Double sided tape
  • Craft foam pads (I used Stix 2mm thick) 


   Take white card 15cm x 30cm and fold it in half. Take a yellow card paper (size 15cm x 15cm) and using double sided tape attach it to the white card. Attach sage green card paper (9cm x 9cm), again using double sided tape, to the red card paper (10 x 10cm). 

Take the red heart and the ribbon. Start wrapping the ribbon around the heart from its right side (where the knot is) ensuring that you leave about 7 cm of the ribbon's end free. Wrap the ribbon 3 x around the heart finishing again at the starting point. Make a knot by tying both ends of the ribbon together. Attach the heart to the sage green card using foam pads cut to size to fit the thickness of the heart. Position one end of the ribbon to the right of the sage green and red card, turn it over the edge of the paper and secure at the back of the card using a double sided tape. Do the same with the second end of the ribbon, positioning it down. Cut off any extra ribbon material. 

Attach 4 x 3mm red gems onto the heart. Attach the sage green and red card with the heart and ribbon to the yellow card using foam pads. 

Saturday, 2 June 2012

Handmade Greeting Card - Colour Variation 1 - Red Heart and an Organza Ribbon

This is the 1st colour variation on handmade greeting card with the red heart and the ribbon. The instructions are same.


  To make this card you will need:

  • Large red heart (I used one from a packet of 20 hearts by Craft For Occasions - purchased from Hobbycraft) http://direct.hobbycraft.co.uk/products-Craft-For-Occasions-Red-Outline-Heart-Shapes_246011.htm
  • 4 Adhesive gems in red (I used Hobbycraft gems sizes 3 mm)
  • Pale sage green card paper (9 x 9 cm)
  • Red card paper (10 x 10cm)
  • White card paper (15 x 30cm)
  • Orange card paper (15 x 15cm)
  • Yellow organza ribbon
  • Message outline sticker of your choice
  • Double sided tape
  • Craft foam pads (I used Stix 2mm thick) 


 Take white card 15cm x 30cm and fold it in half. Take an orange card paper (size 15cm x 15cm) and using double sided tape attach it to the white card. Attach sage green card paper (9cm x 9cm), again using double sided tape, to the red card paper (10 x 10cm). 

Take the red heart and the ribbon. Start wrapping the ribbon around the heart from its right side (where the knot is) ensuring that you leave about 7 cm of the ribbon's end free. Wrap the ribbon 3 x around the heart finishing again at the starting point. Make a knot by tying both ends of the ribbon together. Attach the heart to the sage green card using foam pads cut to size to fit the thickness of the heart. Position one end of the ribbon to the right of the sage green and red card, turn it over the edge of the paper and secure at the back of the card using a double sided tape. Do the same with the second end of the ribbon, positioning it down. Cut off any extra ribbon material. 

Attach 4 x 3mm red gems onto the heart. Attach the sage green and red card with the heart and ribbon to the orange card using foam pads. 


Handmade Greeting Card - Red Heart with an Organza Ribbon

This greeting card is suitable for various occasions; birthdays, Happy Anniversary, Best Wishes, Valentine's Day, With Love. I left the message blank but you can chose any outline sticker message for any occasion you like. 


This card is not difficult to make. The trick is that when you are wrapping the ribbon around the heart, don't make too much of an effort but do it quite fast. It will end up looking more uneven and natural.


 To make this card you will need:

  • Large red heart (I used one from a packet of 20 hearts by Craft For Occasions - purchased from Hobbycraft) http://direct.hobbycraft.co.uk/products-Craft-For-Occasions-Red-Outline-Heart-Shapes_246011.htm
  • 4 Adhesive gems in red (I used Hobbycraft gems sizes 3 mm)
  • Pale gray card paper (9 x 9 cm)
  • Red card paper (10 x 10cm)
  • White card paper (15 x 30cm)
  • Very pale yellow card paper (15 x 15cm)
  • Yellow organza ribbon
  • Message outline sticker of your choice
  • Double sided tape
  • Craft foam pads (I used Stix 2mm thick)


 Take white card 15cm x 30cm and fold it in half. Take a pale yellow card paper (size 15cm x 15cm) and using double sided tape attach it to the white card. Attach gray card paper (9cm x 9cm), again using double sided tape, to the red card paper (10 x 10cm). 

Take the red heart and the ribbon. Start wrapping the ribbon around the heart from its right side (where the knot is) ensuring that you leave about 7 cm of the ribbon's end free. Wrap the ribbon 3 x around the heart finishing again at the starting point. Make a knot by tying both ends of the ribbon together. Attach the heart to the gray card using foam pads cut to size to fit the thickness of the heart. Position one end of the ribbon to the right of the gray and red card, turn it over the edge of the paper and secure at the back of the card using a double sided tape. Do the same with the second end of the ribbon, positioning it down. Cut off any extra ribbon material. 

Attach 4 x 3mm red gems onto the heart. Attach the gray and red card with the heart and ribbon to the pale yellow card using foam pads. 


This design will work well with other colour combinations. I will show you couple of colour variations in my next post.